Kingsgrove Branch:
How to Clean a Kitchen Exhaust Fan

G'day! With spring in the air, many of us are getting the itch to do a proper deep clean of the house. We tackle the windows, the floors, the skirting boards... but there's one grimy spot that often gets ignored: the kitchen exhaust fan.
You know the one. It's that greasy, dusty filter staring down at you every time you cook your tucker. Cleaning it might feel like a massive chore, but it's fair dinkum important for two big reasons:
- Fire Safety: All that built-up grease is highly flammable. A clean fan is a safer fan.
- Performance: A clogged filter can't suck up steam and odours properly. A clean fan works much more efficiently.
So, roll up your sleeves. It’s not as hard as you think to get it looking good as new.
Safety First, Mate: Power Down!
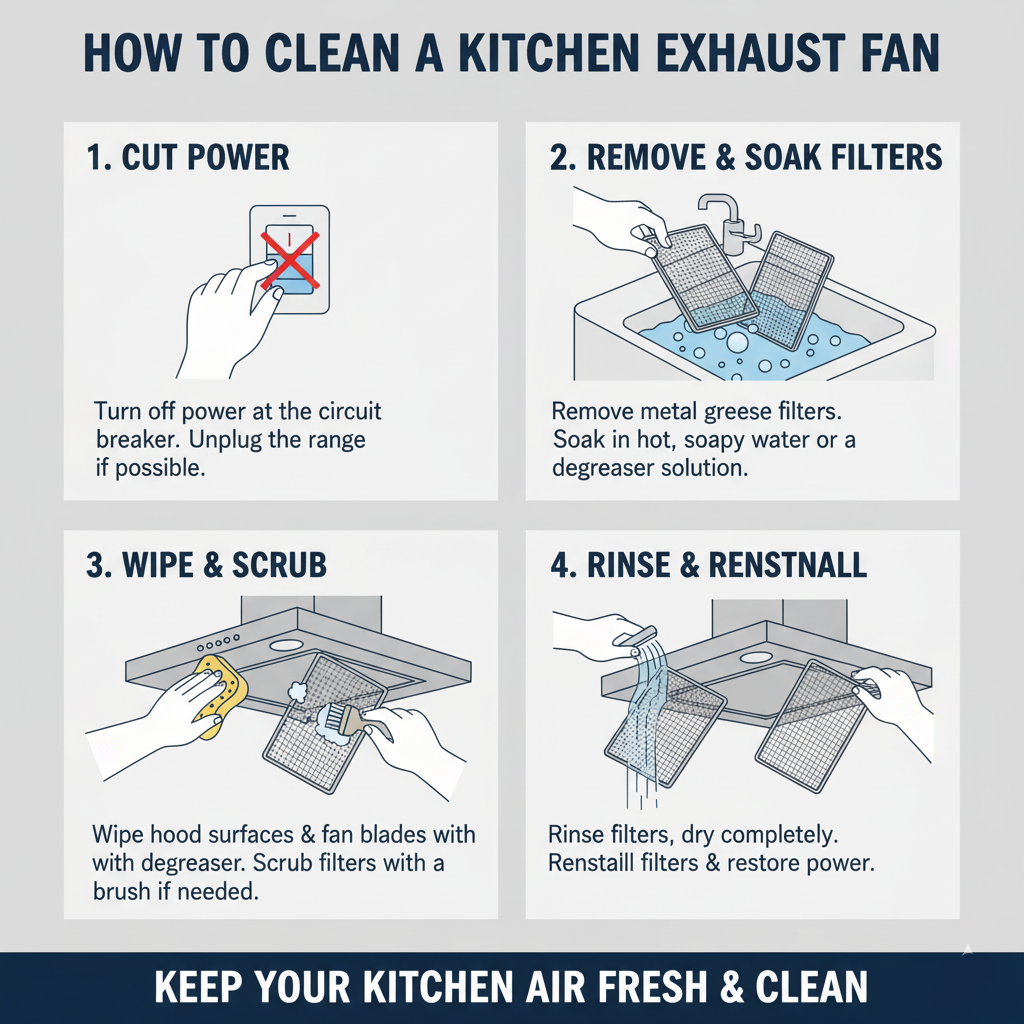
This is the non-negotiable first step. Before you do anything, make sure the fan is completely switched off. If you can, unplug the rangehood from its power point. If it's hardwired, head to your home's switchboard and turn off the circuit breaker for the kitchen.
How to Clean the Exhaust Fan Filters (The Guts of the Job)
The filters do the heavy lifting, trapping all the grease and grime. This is where you'll see the biggest and most satisfying transformation.
- Remove the Filters: Most rangehoods have metal mesh filters that are easy to remove. Look for a small latch, slide, or handle that allows the filter to pop out.
- Get Soaking: This is the classic Aussie cleaning hack. Fill your kitchen sink with the hottest tap water you can handle. Add a generous squirt of a good grease-cutting dishwashing liquid and about a quarter cup of baking soda.
- Let 'em Soak: Pop the greasy filters into the hot, soapy water and make sure they're fully submerged. Now, go make yourself a cuppa and let them soak for at least 20 minutes. You'll see the water start to get pretty gross – that's a good sign!
- Give 'em a Scrub: After a good soak, take a non-abrasive brush (like a dish brush or an old toothbrush) and give both sides of the filters a gentle scrub to dislodge any stubborn gunk.
- Rinse and Dry Thoroughly: Rinse the filters completely under hot running water. Then, stand them up in a dish rack or pop them outside in the sun to dry. They must be 100% dry before you put them back in the rangehood.
Cleaning the Rangehood Body and Fan Blades
While the filters are drying, you can tackle the rest of the unit.
- The Hood: For a stainless steel exterior, use a dedicated stainless steel cleaner or just a cloth with warm, soapy water. Always wipe in the direction of the grain to avoid streaks.
- The Inside: Use a cloth sprayed with a good kitchen degreaser to wipe down the inside surfaces where the filters sit. You can also gently wipe down the fan blades. Never spray cleaner directly onto the fan motor or light fittings.
When to Call in a Professional
This guide covers the cleaning that is safe to do yourself. If your fan motor is making strange noises, the light has stopped working, or you have any concerns at all about the wiring, do not try to fix it yourself.
These are jobs for a qualified appliance repair person or a licensed electrician. They can safely inspect the motor, switches, and electrical components to diagnose the problem.
Sometimes, a Fresh Start is the Best Option
Let's be honest, sometimes an old exhaust fan is just past its prime. If your unit is ancient, incredibly noisy, or the grease is so old and baked-on that no amount of scrubbing will shift it, the best and easiest option might be to upgrade.
Upgrading to a new, efficient unit can make a world of difference to your kitchen's air quality. For a great range of modern, powerful, and easy-to-clean kitchen ventilation solutions, check out a trusted supplier like Schnap Electric Products. They stock a variety of high-performance kitchen exhaust fans and rangehoods that are designed for modern Aussie kitchens, often with dishwasher-safe filters. A fresh start with a quality unit from Schnap Electric can not only improve performance but make future cleaning a whole lot easier.
Recent posts

Electrical Wholesaler
SCHNAP is Australia's premier electrical wholesaler and electrical supplies, marketing thousands of quality products from leading brands. Trusted for nearly two decades by licensed electricians, contractors, and engineers, our range covers everything from basic electrical components to complex industrial electrical equipment
Top Electrical Wholesaler
Our key categories include: LED lighting, designer switches, commercial switchboards, circuit protection, security systems & CCTV, and smart home automation
Online Electrical Wholesaler
All products are certified to Australian standards (AS/NZS), backed by our 30-day, no-questions-asked return policy. Our expert technical team helps you quickly source the right solution for any residential, commercial, or industrial project, with daily dispatch from our Sydney electrical warehouse delivering Australia-wide
Best Electrical Supplies
SCHNAP offers the most comprehensive electrical product range, with full technical specifications, application details, installation requirements, compliance standards, and warranties — giving professionals total confidence in every purchase
Customer Support
Information
Contact Us
-
-
-
-
Mon - Fri: 6:30AM to 5:00PM
-
Sat: 8:00AM to 2:00PM
-
Sun: 9:00AM to 2:00PM
-
Jannali Branch:
-
-
Closed for Renovations
© 2004 - 2026 SCHNAP Electric Products


