
Kingsgrove Branch:
![]()


MC4 connectors are simple enough to install — but only if you do it right. Get it wrong, and you're looking at a high-resistance join that quietly heats up every time the sun's out. Do that long enough, and you've got a real fire risk on your hands.
This guide covers exactly how to crimp MC4 connectors correctly: what tools you need, the exact strip length, a step-by-step walkthrough, troubleshooting common problems, and the mistakes that show up most often on failed inspections. If you're doing any solar DC wiring in Australia — rooftop, ground-mount, or off-grid — this is worth reading before you pick up the crimper.
Already know the basics and just need gear? Schnap stocks MC4 crimping tools and MC4 connectors with same-day dispatch from Sydney.
A properly crimped MC4 connector is a gas-tight mechanical connection — the metal of the cable conductor and the contact pin are compressed together so tightly that there's no gap for oxidation or movement. Resistance is minimal. Heat doesn't build up. The connection stays stable for the 25-year life of the system.
A poorly crimped connector is the opposite. There's a tiny air gap. Resistance creeps up. On a DC string that's producing current all day in the Australian sun, that resistance becomes heat. Insulation softens. The connection loosens further. Eventually, arcing starts.
The Clean Energy Council has flagged poor crimping as one of the top causes of rooftop solar fires in Australia. This isn't a technicality — it's a safety issue. And it's entirely preventable with the right tool and the right technique.
Before touching any MC4 connector on a grid-connect system, it's worth knowing what compliance actually requires.
AS/NZS 5033:2021 — the governing standard for PV array installation in Australia — requires:
AS/NZS 3000:2018 (the Wiring Rules) covers all fixed electrical installations. Grid-connect solar falls under this, meaning all termination work must be done by a licensed electrician.
⚠️ Licence Requirement: All DC wiring work on grid-connected PV systems in Australia must be performed by a licensed electrician with CEC accreditation. The only exception is low-voltage off-grid systems (12V/24V) in caravans, 4WDs, and portable setups.
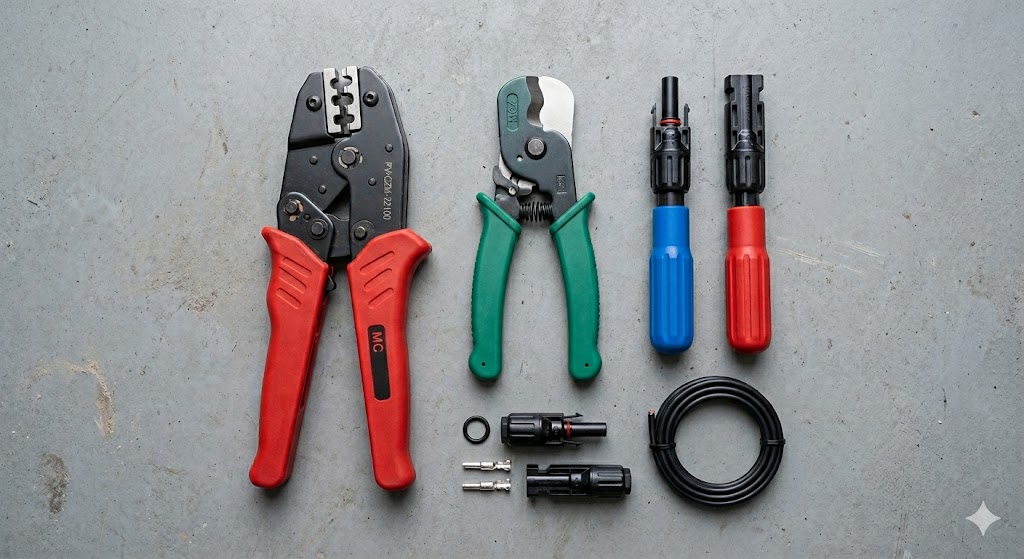
This is where most DIY crimps go wrong — using the wrong tool. Here's what you actually need:
| Tool | Why It Matters | What Happens Without It |
|---|---|---|
| MC4 ratchet crimping tool | Shaped specifically for MC4 contact pins — gives a gas-tight crimp every time | Generic crimper leaves gaps — high resistance, heat buildup, fire risk |
| Solar cable stripper | Strips to exactly the right depth without nicking conductor strands | Nicked strands = weak crimp. Wrong strip length = poor contact or exposed conductor |
| MC4 disconnect / assembly tool | Seats and releases connectors without damaging the locking collar | Screwdriver damage to locking collar = connector that won't stay seated or seal |
| Multimeter | Continuity and polarity check before connecting to the array | Polarity reversal on a live string damages panels and is dangerous to diagnose |
Schnap stocks MC4 crimping tools and MC4 crimper with guide — trade pricing, same specs used by licensed installers.
Not all MC4 connectors fit all cable sizes. Wrong combination = barrel too small to accept the conductor, or conductor too thin to fill the barrel and crimp properly.
| Cable Size | Typical Use | Max Current | Connector to Use |
|---|---|---|---|
| 2.5mm² | Small off-grid systems, short runs | 30A | MC4 rated for 2.5–4mm² |
| 4mm² | Standard residential rooftop — most common in Australia | 45A | MC4 rated for 4mm² (most common) |
| 6mm² | Long runs, commercial arrays, high-output panels | 57A | MC4 rated for 6mm² — confirm spec sheet |
Schnap stocks MC4 connector pairs and 1500V rated MC4 pairs for both residential and commercial installs.
Make sure your cable is the right spec. For any Australian rooftop or grid-connect system, you need dual-insulated, UV-resistant solar DC cable — typically 4mm² for residential, 6mm² for longer runs. Standard TPS building wire is not rated for PV use.
Also check you have enough of the same brand connector for the entire string. Mixing brands is a compliance issue under AS/NZS 5033. More in our full MC4 connector guide.
Remove exactly 7mm of outer insulation. Too short = conductor won't fill the barrel. Too long = bare conductor exposed past the pin, potential arc point. Check strands after stripping — tight and unbroken. Any nicked strands, cut back and re-strip.
Thread the end cap onto the cable before you crimp. Single most common mistake on the job. Once crimped, the end cap won't go over — you'll have to cut it off and start again.
Push the stripped conductor fully into the MC4 contact pin until flush with or just past the barrel end. All strands inside — none visible outside.
Polarity tip: Standard Australian convention is male MC4 on positive, female on negative. Always confirm against your panel's datasheet — not all manufacturers follow the same convention. A polarity reversal on a live string will damage panels.
Squeeze firmly until the ratchet releases fully — that's the crimp completing to the required force. Don't release early. A partial crimp is harder to detect than no crimp at all.
Tug test: grip the cable, pull firmly. Conductor should not move. If it pulls out, the crimp failed — cut back and start over.
Push the crimped pin into the housing until you feel and hear a distinct click. No click = not seated. The connector will pull apart under load.
Second tug test: pull the cable while holding the housing. Pin should not move.
Slide the rubber seal in place and tighten the end cap finger-tight plus a quarter turn. No more — overtightening splits the seal and kills your IP67 rating.
Click male to female. Before connecting to the array, check polarity with a multimeter. Polarity reversal on a live DC string won't trip a breaker — it damages panels and is dangerous to diagnose while energised.
⚠️ High Voltage Warning: Grid-connected rooftop solar systems operate at up to 1000V DC. All connection work in Australia must be performed by a licensed, CEC-accredited electrician. This guide is for educational purposes only.
| Problem | Likely Cause | Fix |
|---|---|---|
| Connector won't click together | Pin not fully seated, or wrong gender combination | Push pin deeper until it clicks; confirm male/female orientation |
| Conductor pulls out after crimping | Incomplete crimp or wrong tool | Cut off, re-strip to 7mm, re-crimp with correct MC4 tool |
| Connector feels loose after assembly | End cap not tightened, or cable OD too small for housing seal | Tighten end cap; if cable undersized for housing, use correct connector spec |
| Hot connector or discolouration | High-resistance crimp from bad tool or partial crimp | Isolate string, replace connector — do not re-use a heat-damaged pin |
| String output lower than expected | Polarity reversal, loose connection, or shading | Check polarity, inspect all crimps on affected string |
| Connector won't separate | Wrong tool or damaged locking collar | Use MC4 disconnect tool; damaged housing = replace entire connector |
| Water ingress into connector | Seal not seated, end cap loose, or cable OD mismatch | Disassemble, dry, inspect seal — replace if compressed or cracked |
Once MC4 connections are made and tested, cables need to be properly managed and secured. UV-rated solar cable ties are the right choice — standard nylon goes brittle within a season on a hot Australian roof.
Schnap stocks UV-resistant black cable ties for standard residential installs, stainless steel pawl cable ties for coastal or high-corrosion environments, and stainless steel solar cable clips for securing cables to racking.
For more: Solar Cable Ties for Australian Installs.
Q: Can I use a regular crimping tool for MC4 connectors?
MC4 contact pins need a specific jaw profile for a gas-tight crimp. Generic ratchet crimpers are designed for ferrules or ring terminals — wrong tool produces internal gaps that cause resistance buildup and eventual failure.
Q: How do I know if my crimp is good?
Tug test: grip the cable, pull firmly while holding the housing. Conductor should not move at all. The ratchet must also complete its full cycle — releasing mid-cycle means incomplete crimp.
Q: What tools do I need to disconnect MC4 connectors?
A dedicated MC4 disconnect tool. Using a screwdriver cracks the locking collar and compromises the IP67 seal. If a connector is stuck, confirm you're using the right tool for that connector brand.
Q: What's the correct strip length for MC4 connectors?
7mm is standard for most MC4 contact pins. Always confirm against your specific connector brand's spec sheet — some variants differ slightly.
Q: Which way is positive on an MC4 connector?
Standard convention: male MC4 on positive, female on negative. Always confirm with a multimeter before connecting to the array — not all panel manufacturers follow the same convention.
Q: Can I re-crimp a connector that failed the tug test?
No. The metal has deformed. Re-crimping changes the geometry and creates an unreliable connection. Cut off, trim past the stripped section, start fresh with a new pin.
Q: What happens if I get MC4 polarity wrong?
Polarity reversal on a grid-connect string won't trip a breaker. It causes reverse current through panels, damages bypass diodes, and permanently reduces output. Always check polarity with a multimeter before connecting to the array or inverter.
Q: Do I need a licence to crimp MC4 connectors in Australia?
For 12V off-grid (caravan, 4WD, portable) — no. For grid-connected or roof-mounted systems — yes. All DC wiring on grid-connect PV must be done by a licensed, CEC-accredited electrician.
Q: Can you connect MC4 connectors from different brands?
Under AS/NZS 5033, no — unless both manufacturers explicitly approve the combination. Connectors may physically click together but manufacturing tolerances differ, causing micro-arcing over time. Common reason for failed inspections.
Q: Do MC4 connectors need regular inspection?
Yes. Inspect for heat discolouration, housing cracks, UV degradation, and water ingress as part of routine solar maintenance. CEC-accredited installers typically recommend every 2–5 years — coastal and high-UV sites more frequently.
Q: Are MC4 connectors waterproof?
Yes — when correctly assembled. IP67 rating means dustproof and waterproof to 1 metre. The seal only works if the end cap is tightened correctly and cable OD matches the housing spec.
Q: What's the difference between MC4 and MC4-EVO connectors?
MC4-EVO2 is Stäubli's updated design with improved contact geometry and higher current ratings. Stäubli confirms MC4 and MC4-EVO2 are cross-compatible. All other third-party "MC4 compatible" brands should not be cross-mated without explicit manufacturer approval.
Q: How many times can you disconnect and reconnect MC4 connectors?
Typically 10–30 mating cycles depending on manufacturer. MC4s are designed for permanent connections, not repeated disconnection. If you're regularly disconnecting a circuit, a DC disconnect switch is more appropriate.
Schnap supplies licensed solar installers across Australia with MC4 crimping tools, MC4 connectors, UV solar cable ties, stainless steel cable ties, and stainless steel solar cable clips.
Trade pricing. Same-day dispatch from the Sydney warehouse.
SCHNAP Electrical Wholesaler - clear, upfront pricing that professional electricians trust
Get what you need in seconds. SCHNAP electrical wholesaler makes ordering quick and simple
Fast delivery anywhere - that's guaranteed. SCHNAP electrical wholesalers ship nationwide with same-day dispatch
Track your order every step of the way. SCHNAP electrical wholesale keeps you updated from click to delivery

SCHNAP is Australia's premier electrical wholesaler and electrical supplies, marketing thousands of quality products from leading brands. Trusted for nearly two decades by licensed electricians, contractors, and engineers, our range covers everything from basic electrical components to complex industrial electrical equipment
Our key categories include: LED lighting, designer switches, commercial switchboards, circuit protection, security systems & CCTV, and smart home automation
All products are certified to Australian standards (AS/NZS), backed by our 30-day, no-questions-asked return policy. Our expert technical team helps you quickly source the right solution for any residential, commercial, or industrial project, with daily dispatch from our Sydney electrical warehouse delivering Australia-wide
SCHNAP offers the most comprehensive electrical product range, with full technical specifications, application details, installation requirements, compliance standards, and warranties — giving professionals total confidence in every purchase
Kingsgrove Branch:
Opening hours:
Mon - Fri: 6:30 AM to 5 PM
Saturday: 8:00 AM to 2:00 PM
Sunday: 9:00 AM to 2:00 PM
Closed on public holidays
Jannali Branch:
Closed for Renovations
© 2004 - 2026 SCHNAP Electric Products